Forward-facing sonar has taken the entire fishing world by storm. Whether you love it or hate it, it’s become a vital tool to locate fish of all species around the globe. The Garmin LiveScope Plus System allows you to have underwater eyes to see exactly what’s going on beneath your boat, in real time. Whether you’re chasing bass, panfish, or even tuna, this tech is now an integral part of fishing electronics. LiveScope has become one of the most effective technological fishing advances in today’s day in age.
But what exactly is it? How does it work? What makes it so special that truly separates it from the other competitor bands? This is a full breakdown of Garmin LiveScope Plus and how you can use it to its full potential. I’ll admit, it can be complicated at first, but with a little help you’ll be a pro with live sonar in no time!
What Is The Garmin LiveScope Plus System? What Does it Come With?
Garmin LiveScope Plus is essentially what it sounds like. Unlike 2D sonar, LiveScope is a sonar that displays a real-time forward-facing view at all times. It has an ultra clear picture that will show you everything that’s going on in the water column.
The complete LiveScope Plus System comes as a separate transducer and a GLS10 transfer box — aka the Black Box, as everyone calls it — that you can hook up to a compatible Garmin fish finder/chartplotter. Remember, not all Garmin marine electronics are compatible with the LiveScope, so check to see if your unit will work with it before purchasing.

It also comes with a network cable with an ethernet port attachment, LVS34 transducer, trolling motor mount for either the barrel or shaft of the motor, and a transom mount. It’s truly a complete system, without all of the pieces it will not work right.
Unlike traditional 2D Sonar or side/down imaging, which shows you a delayed image of what is already behind the boat, LiveScope gives you a “live” view of what’s going on below or even in front of your boat. Utilizing the LVS34 transducer either on a pole mount, transom mount, or trolling motor mount, you can see all around your boat.
Besides a forward and down view, Garmin came out with a mount (sold separately) that is meant to put your LVS 34 transducer into “perspective” mode, which gives you a much wider view of the bottom, similar to the Humminbird 360 transducer. Unlike 360, which gives you a recorded image of what’s around your boat, once again, the Garmin displays this view in real time. You can actually see fish swimming around across your screen in and around structure.
The LVS 34 transducer looks rather large when you pull it out of the box, and in reality it is. On its bottom side, it’s going to look concave and have three different strips. Those strips are what actually reads the bottom in each different viewing mode.
The transducer also has three white dashes on it. These dashes coincide with the strips on the bottom to ensure you have the right picture on your screen. One is for down view (top strip), one is for forward view (middle strip), and the last one is for perspective view (bottom strip). When projected out, the cone angle is only 18- 20 degrees, so you will need to keep scanning around to get the best picture.
How Garmin LiveScope Plus Was Developed: The History of Live Viewing Sonar

Ten years ago, in 2015, Garmin came out with a product called Panoptix. This was the first technological advancement in live-view sonar technology. At first the concept seemed genius, but when displayed on the screen, even though it was in real time, the fish and bottom structures were very distorted. Everything was visible, but it was hard to make out parts of the bottom and to tell what parts of the image were actually fish.
Three years later, in 2018, Garmin introduced LiveScope with the GLS10 “black box” and the original LVS32 transducer. Garmin fixed all the bugs with pixelation and stabilization on the screen to give you, what was at the time, the clearest image of live sonar on the market. You could make out individual fish and almost interpret what species they were. Along with fish, objects on the bottom came out clear, and you can easily see where the fish were relating to those structures.
Fast forward to 2022: Garmin came out with the LVS34 and LVS62 transducers. Amazingly, Garmin worked out the kinks in the LVS32, like the bottom stabilization and screen freezing, to now create what were the two most high resolution live sonar transducers available. More importantly, the range was increased to see farther away in extremely deep water, especially the LVS62 transducer, which was built for offshore tuna and marlin fishing to reach depths and ranges into the thousands of feet.
At this point in the game, no one could even reach Garmin’s advances in the game of live view sonar.
How Does LiveScope Actually Work? How Do You Set It Up?
When you first see Garmin’s LiveScope Plus in action, you might think to yourself, “How am I able to see all of this on my screen so clearly?” We’ll get to that, but first, let’s take a look at how the whole works is set up.
On the back of your Garmin unit, whether it’s an Echomap or GPSMap series model, you will find two ethernet ports. This is where your network cable will plug into your Garmin head unit and connect to the transfer box. Make sure the port is clean; any sort of debris will affect your connection. Then you will have to attach the power cable to the transfer box itself and connect it to a power source.
The transducer wire for all LiveScope units, which comes attached to the transducer, consists of a 21-pin series cable. If you’re installing this on the trolling motor shaft or barrel, make sure the cable has enough space to swivel around and not get pinched. I forgot to do this and pinched the cable clean apart: a costly mistake.
Also, when attaching the cable to the trolling motor or pole shaft, it’s better to do so with electrical tape instead of zip ties. Electrical tape will not pinch the cable, while zip ties could damage one of the many wires inside the cable and cause image display problems. When plugging the transducer to the transfer box, make sure you line up all the pins correctly, so you don’t break any of them.

Your battery power source has the most to do with your image clarity. The higher the voltage, the clearer the picture will be and the less interference you will have. This is why many anglers use lithium batteries for their power source.
I run an Amped Outdoors Lithium that’s 12.8 volts and 100 amp hours. This battery powers one Echomap UHD 2 106sv, one Echomap UHD 2 93sv, two Echomap UHD 2 73sv units, as well as my Garmin transfer box.
This battery, in conjunction with a proper wiring harness and fuse box system, will ensure a solid 13 volts at all times, giving you the clearest picture possible. I built my own marine wiring harness out of six gauge marine wire but you can buy pre-made wiring harnesses, like the Precision Sonar Seaclear Harness. With this setup, I can usually get two full 10 hour days on the water before draining the battery dead, and that’s with all four of my graphs being on all day as well as my transfer box.
To power my screens and transfer box, I run all power corrds from each screen and the transfer box to some sort of control/fuse panel. Now, this is not to be confused with your existing panel that houses all your switch fuses. Keeping power for your electronics on its own separate fuse panel ensures that you can easily trace your wires when necessary without having to rummage through the maze of wires under your console.
I attach my wiring harness to that second, independent fuse box and then back to the battery. It’s a good idea to add a main power switch to make sure all power is cut when you want it to be and you don’t have units drawing juice from your battery while on standby.
Improvements in the Latest Versions of Garmin LiveScope Plus
As with any piece of technology, having the most recent update will ensure your unit will work properly on the water. The last thing anyone wants is electronics bugs ruining a day of fishing. On Garmin’s website, they have a list of all the available software updates, from version 2.00 to the latest 2.79 version.

The latest 2.79 version is the most current update for your transfer box, which fixed the bottom stabilization issue going on with all the transducers. Remember, it is important to always keep your main screen that connects to your LiveScope (aka your “head” unit) up to date in conjunction with your black box. This will ensure fewer issues on the water.
The Settings That Matter: How to Dial in Your LiveScope

Like any marine unit, there are certain settings that have to be adjusted to fully eliminate any interference. These are just suggestions based on what I use on the water. I’m constantly changing my settings from each body of water as each place has different water quality conditions.
Your settings will not be the same in a shallow eutrophic lake as they will be in a deep, clean reservoir. Here are some of the settings that are available on your LiveScope that you should pay attention to.
Range
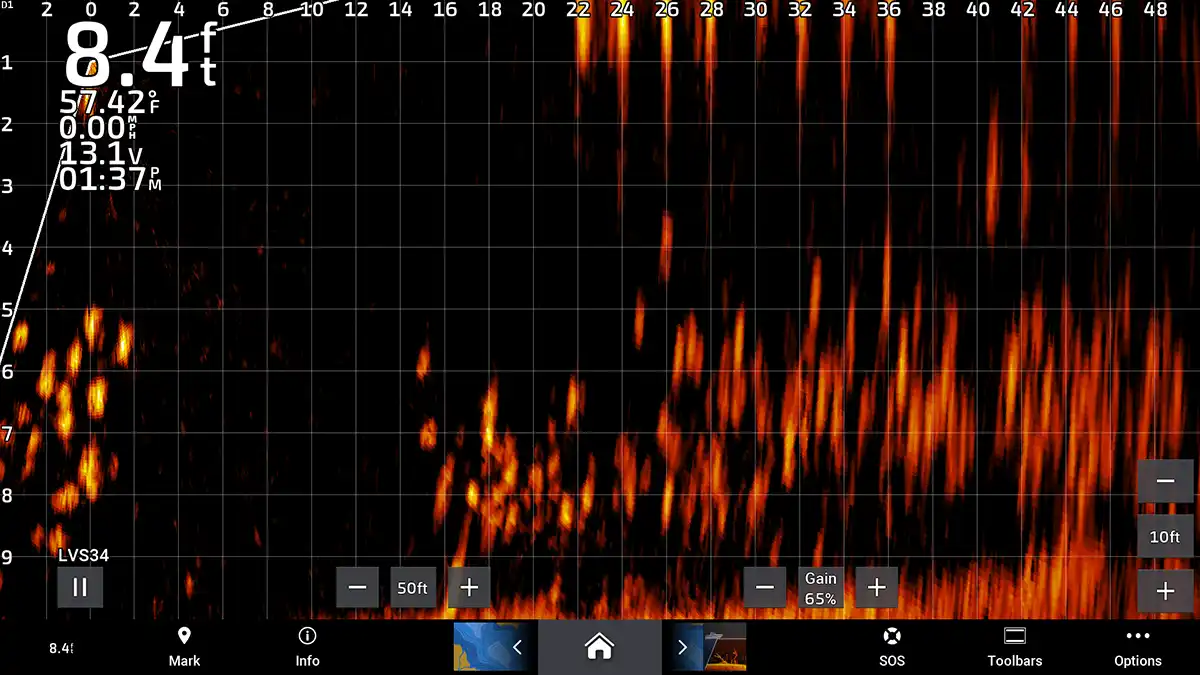
The range is how far out you want your transducer to read. The max range depends on how much power is coming to the head unit. The more power, the more clear the image, the further you can extend your range to see further in front of you.
When I’m running my transducer in forward view, I generally keep my rage between 80 and 100 feet. This allows me to see everything within casting distance. As long as I sustain good voltage, I can accurately make out what each object is on the screen. In perspective mode, you never want to exceed a range of 60 feet, especially in shallow water. It takes a lot to create that 165-degree view, and you don’t want your picture to be all distorted.
Gain
This is arguably one of the most important aspects of live-view sonar. Think of it like a flasher for ice fishing. The higher the gain, the more sensitive your transducer will be to pick up every little movement. The same is true for LiveScope. In deeper water you can run your gain higher than in shallower water, where you’ll pick up a lot more interference.
I usually run my gain at 70% to 72% when I’m in water deeper than 20 feet, and 55% to 68% when I’m at 15 feet and shallower. This allows for the best picture while still being able to see fish, structure, and even my bait.
Color Scheme
This is another extremely important setting. When you first set up your whole system, the color scheme will default to “amber,” which is a great all around color. The darker color schemes display great separation between the bottom structure and the fish swimming around it in forward, down, and perspective mode. But there are a few other color options that may work better for you.
When I’m running my LiveScope in forward or down view, I prefer to use the blue or white color schemes, which helps me see the size difference in fish better. Like normal 2-D sonar, fish on this color scheme can show up in variations ranging from light green for small fish and deep red for larger fish.
In perspective view, I often use a darker color scheme, like amber or Lava. In this view, I’m often looking for structure, and those color schemes give me the best clarity for seeing what type of structure is on the bottom. Whether it be weeds, rock, hard sand, even bass and bluegill nests, you can easily make them out in the darker schemes.
Noise Rejection
This setting helps when trying to eliminate interference on your screen. If you have this setting turned off, you will see lots of clutter and things that look like small fish all over your entire range of view.
This is something that you’ll want to monitor depending upon where you are fishing. In shallow, dirty water, you’ll probably want to keep it on either Medium or High and vice versa for deep, clear water. The higher the noise rejection, the less clutter on the screen.
Time Variable Gain (TVG)
TVG, or Time Variable Gain, controls how information on your screen is filtered from the top to the bottom, then out to your extended range. In shallow water, you want to keep this off at all times so you can get the most out of your range and see objects at the end of it. In fact, I almost always keep this off, but sometimes, in deeper water, I turn it on low to eliminate a little bit of the clutter on the screen closer top the boat. TVG has a tendency to create quite a bit of clutter and interference up close to the boat out to about 20 feet.
Advanced LiveScope Tips and Tactics

Now that you’ve got your LiveScope Plus System mounted to your boat, kayak, or shuttle, you’re probably itching to get on the water and use it. But you have to keep in mind that it’s not going to have fish jumping in your lap. There’s still a huge learning curve.
Most anglers think of this style of fishing as cheating because it’s so easy, but that assumption is pretty far from the truth. FFS like LiveScope is just another tool to help you break down water a little faster, and help you learn more about fish, structure, and how they use it. Here are a few tips that will help reduce the LiveScope learning curve:
- When you get the unit installed, test everything in simulator mode to make sure it works, and to get a better understanding of how things look on your screen.
- Your first day on the water with it should be spent getting the kinks worked out and dialing in the settings to your specifications.
- Go to areas of the water body that you know have a lot of fish or structure. Check out some of your favorite spots and see what they look like on LiveScope so you have a better understanding of how it displays information.
- If you want to pick up a rod and try casting at certain fish, cast at everything. This will help you determine what is a bass, pike, walleye, panfish, carp, etc. on the screen. They all show up differently and with time, you’ll be able to distinguish them all. There’s not a reference guide that I know of that would help with this, as every unit and Livescope combination is very different. What could show up on someone’s screen, doesn’t mean it will show up on yours
- Your line and bait will not always show up on screen. Remember, your cone angle that the transducer shoots out is only an 18-20 degree angle.
- Take the time to learn more about your casting accuracy. Over time, you’ll figure out what 20-, 50-, even 100-foot casts really are and how your bait sits in a pendulum to the boat on a cast.
Pros and Cons
Like any piece of fishing technology, the Garmin LiveScope has a few pros and cons. To me, it’s definitely more good than bad.
Pros:
- It has a very user-friendly interface. You only have to make some small tweaks to get it dialed in. After a bit of time, you’ll understand it’s only some small tweaks that need to be made to get it dialed.
- The system helps you learn more about what’s happening beneath the surface.
- You can see fish, structure, your bait, and how the fish react to all of it in real time.
- LiveScope helps shorten the learning curve when figuring out a body of water.
Cons:
- It’s pricey. To get started with a complete setup, it’s going to run in the thousands of dollars (MSRP on the LiveScope Plus System alone is $1699.99 and bundles with a head unit can cost over the $4,000 range).
- You have to have adequate battery power. If there’s not enough juice going to the black box and unit, you won’t have a clear picture.
- The system isn’t exactly portable; all of the components are bulky. It’s a lot to carry around, especially on a smaller boat, kayak, or canoe.
What Makes The Entire System Stand Out From Other Brands?
Ever since Garmin introduced LiveScope to the world, every other marine-electronics manufacturer on the market has introduced a live-view forward-facing sonar system — see the Humminbird Mega Live or the Lowrance Active Target. In my opinion, after seeing all three in action, the Garmin LiveScope Plus System still reigns supreme.
Not only were they the first ones to craft the technology, but their processors are faster than any other unit. Humminbird and Lowrance have a much greater lag on the transmission process between the transducer and the unit, causing the view to not be in true real time. Also, the picture quality and target separation doesn’t even come close to what Garmin has to offer. They are the leaders in FFS technology.
—
The Garmin LiveScope Plus System has truly changed the way anglers will fish around the globe for many species. Hopefully this complete breakdown of the entire system will be something that all anglers can learn from and have a better understanding. It is a tough code to crack but, once you figure.